How To Make Paper Butterflies For Wall? Step By Step Guide!
To make paper butterflies for your wall, start by gathering colorful paper, scissors, glue, a pencil, and a butterfly template.
Choose sturdy origami or cardstock paper. Trace the template onto the paper and neatly cut out the shapes. Fold the paper diagonally to form a triangle, guarantee sharp creases, and cut precise wing shapes from the template.
Create a small oval body and attach it to the wings. Add wire or thread for antennae, and decorate the wings with markers or stickers. Use removable adhesive strips to attach the butterflies to your wall. Ready for more creative tips?

Key Takeaways
Gather Your Materials
To begin, gather a variety of colorful paper, scissors, glue, a pencil, and a template for butterfly shapes.
Lay out your materials on a clean workspace. The colorful paper will give your butterflies vibrant wings, so choose shades that appeal to your sense of creativity.
Use the pencil to trace the butterfly template onto the paper. Make sure your scissors are sharp for precise cuts, and cut along the traced lines carefully.
The glue will secure the layers of the butterfly if you choose to add dimension. Having all these materials organized before you start will streamline the creation process, making it efficient.
This foundation sets you up for innovative and eye-catching wall décor.
Choose Your Paper
- Start by selecting the right type of paper, such as origami paper or colored cardstock, which holds its shape well.
- Next, choose colors that complement your wall or create a vibrant contrast for visual impact.
- Use a variety of patterns and textures to add depth and interest to your butterfly display.
Types of Paper
Your choice of paper can dramatically influence the look and durability of your butterfly wall art. Start with standard origami paper; it’s thin yet robust, making it easy to fold intricate designs.
For a more textured appearance, consider using cardstock; it’s sturdier and adds a dimensional effect. Tissue paper offers a delicate, almost translucent look, perfect for light, airy butterflies.
Don’t overlook patterned scrapbook paper; it’s available in countless designs and adds visual interest without additional effort.
Experiment with metallic or glitter paper for a touch of shimmer, or try recycled paper for an eco-friendly approach.
Always test a small piece first to make sure it folds well and retains shape. Your innovation starts with the right paper choice.
Color Selection
When choosing colors for your paper butterflies, consider the overall theme or mood you want to create on your wall. Think about how different colors can evoke various feelings and complement your existing décor.
- Vibrant Hues: For a lively, energetic space, go for bright colors like red, yellow, and orange.
- Pastel Shades: If you desire a calming, serene atmosphere, opt for soft pastels such as lavender, mint, and blush pink.
- Monochromatic Tones: For a modern, sophisticated look, stick to shades of one color, like different blues or grays.
Lay out your paper choices side by side to see how they interact. Experiment with combinations to find the perfect palette that brings your vision to life. This step is essential for creating a cohesive and visually appealing display.
Cut the Paper
- First, select the type of paper you want to use, such as colored cardstock or patterned paper.
- Next, measure the paper based on the butterfly template you’ve chosen, ensuring accuracy for consistent shapes.
Choose Paper Type
Select a medium-weight craft paper in colors or patterns that complement your wall decor, and use scissors to cut the paper into symmetrical butterfly shapes.
This type of paper provides the perfect balance between flexibility and sturdiness, making it easier to shape and display your butterflies.
Consider the following when choosing your paper:
- Color Scheme: Opt for colors that either contrast or blend seamlessly with your existing decor to create visual interest.
- Patterns: Experiment with patterned paper for a dynamic, textured look that adds depth to your wall.
- Durability: Make sure the craft paper is durable enough to hold its shape but not too thick to fold easily.
Measure and Cut
Now that you’ve chosen the perfect paper, lay it flat and use a ruler to measure and mark symmetrical butterfly shapes before cutting them out with sharp scissors.
Start by drawing a horizontal line to define the butterfly’s body. Next, sketch the wings symmetrically on either side of the line. For consistency, you can create a template from cardstock first.
Once your shapes are marked, use sharp scissors to cut them out carefully, ensuring clean edges. If you want a 3D effect, fold the butterflies gently at the body line. To add vibrant details, decorate the wings with paint, markers, or glitter. You can also layer different sizes of butterflies to create depth and realism. For more creative ideas on how to make plastic butterflies, experiment with translucent materials or patterned plastic for a unique touch.
For added precision, consider using a craft knife and cutting mat. This step is essential for creating uniform, eye-catching butterflies that will bring an innovative flair to your wall display.
Fold the Paper
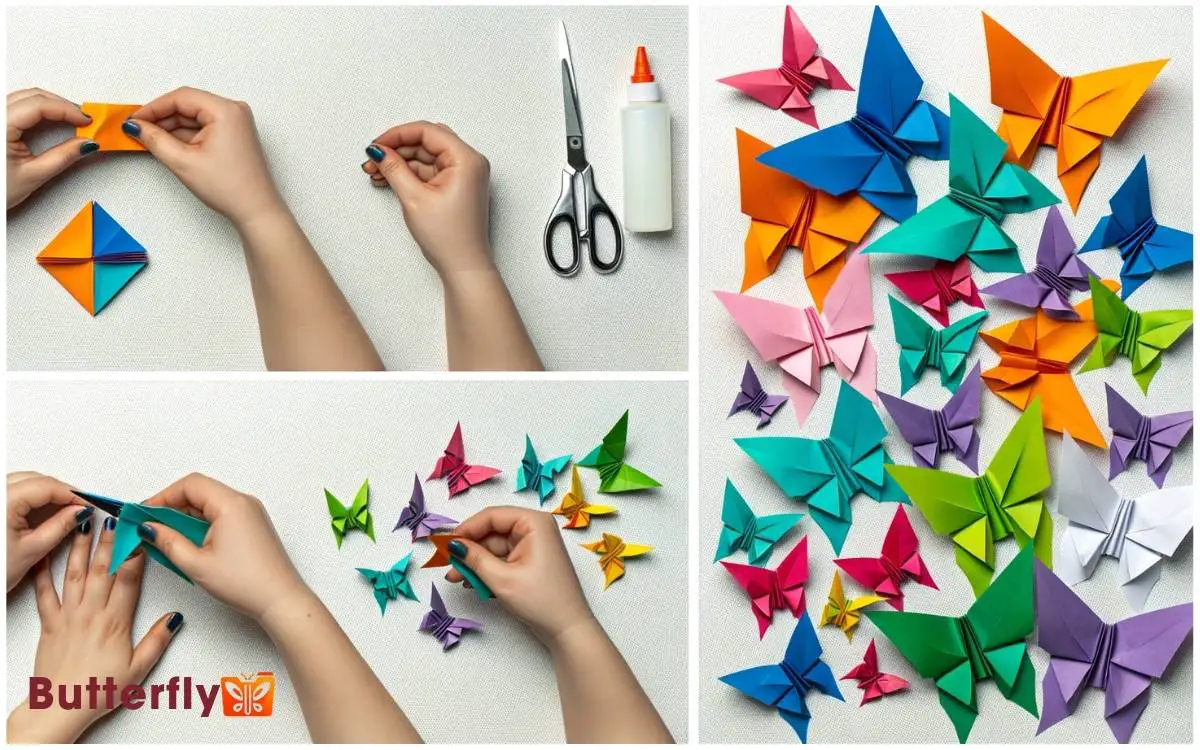
Start by folding the square piece of paper diagonally to form a triangle, aligning the corners precisely. This initial fold sets the foundation for your butterfly’s symmetry.
Next, fold the triangle in half again to create a smaller triangle. Unfold this second fold to reveal a crease line down the center.
- Ensure sharp creases by running a fingernail along each fold.
- Maintain symmetry by double-checking that all corners align before creasing.
- Use contrasting paper to create eye-catching designs.
- Unfold the paper back to the larger triangle.
- Rotate it so the long side faces you, then bring the top corner to the bottom, creating another crease.
These folds will guide you in shaping the butterfly’s wings.
Create Wing Shapes
Start by choosing butterfly templates that match the size and style you want. Once you’ve selected your templates, trace them onto the folded paper.
Carefully cut out the wing shapes, ensuring you follow the lines precisely for a clean finish.
Choose Butterfly Templates
Selecting the right butterfly templates is crucial for creating beautiful and accurate wing shapes. Start by searching for high-quality templates online or in craft books.
Choose designs that resonate with your vision and match the aesthetic you’re aiming for. Verify the templates are scalable so you can adjust the size to fit your wall space.
Here’s how to choose your templates:
- Variety: Select a mix of butterfly shapes to add diversity to your display.
- Detail: Opt for templates with intricate details to enhance visual interest.
- Scale: Confirm templates can be resized without losing clarity.
Print your chosen templates on sturdy paper to maintain shape and durability. These steps will help you create stunning paper butterflies that capture attention and add a touch of innovation to your space.
Cut Out Wings
Once you’ve chosen and printed your butterfly templates, carefully cut out the wing shapes using a sharp pair of scissors or a craft knife. Make sure your cutting tool is precise to prevent jagged edges.
Start by cutting around the outer lines of the wings. For intricate designs, use a craft knife on a cutting mat, gently following the lines. Keep a steady hand and rotate the paper, not the scissors or knife, for smoother curves.
After cutting, inspect each wing for any rough edges and trim if necessary. Lay out your cut wings on a flat surface to visualize your progress. If you desire, use different colored or patterned paper for a more dynamic and innovative display.
Secure the Wings
To secure the wings, carefully align them with the butterfly’s body and apply a small amount of glue to the central crease. Hold the wings in place until the glue sets.
Now, let’s enhance your wings’ stability:
- Reinforce the attachment: Add a thin strip of paper over the central crease, securing it with additional glue.
- Shape the wings: Slightly bend and curl the edges of the wings to create a lifelike appearance.
- Test the connection: Gently tug on the wings to make sure they’re firmly attached and adjust if necessary.
These steps guarantee your butterfly’s wings won’t sag or detach, ensuring a professional and polished finish. Remember, precision in these details will elevate the final look of your decorative paper butterfly.
Add Butterfly Body
Start by cutting out a small, elongated oval from a contrasting piece of paper to serve as the butterfly’s body. Choose a color that stands out against the wings for a striking effect. Place the oval in the center of the wings, vertically aligned.
Next, use a dab of glue on the back of the oval and press it firmly onto the wings. Hold for a few seconds to make certain it sticks well. For added dimension, gently fold the oval lengthwise to give the body a slight curve.
To make your butterfly even more realistic, consider adding thin strips of paper or pipe cleaners as antennae. Simply glue them to the top of the body, and you’re all set!
Decorate the Wings
Bring your butterfly to life by adding vibrant colors and intricate patterns to its wings. Start by selecting your desired color palette.
Use colored markers, paints, or even glitter to make each wing unique. Draw delicate lines and shapes to mimic real butterfly patterns.
- Layered Colors: Apply a base color, then add contrasting hues for a 3D effect.
- Stencils: Utilize stencils for consistent, symmetrical designs.
- Mixed Media: Combine markers, paints, and stickers for a dynamic look.
Don’t hesitate to experiment with textures and materials. For a modern twist, consider using metallic or neon colors. Make sure each wing matches your overall vision and complements your room’s decor.
Your butterfly should be a vibrant piece of art that catches the eye and adds a touch of elegance to your space.
Attach Antennae
Cut two small pieces of thin wire or black thread to create the butterfly’s antennae.
Next, use a pair of tweezers to gently bend the wire or thread into a slight curve, mimicking the natural shape of a butterfly’s antennae.
| Step | Action | Tool Needed |
|---|---|---|
| 1 | Cut wire/thread | Scissors |
| 2 | Bend to shape | Tweezers |
| 3 | Apply glue | Glue stick |
| 4 | Attach to body | Fingers/Tweezers |
After shaping, apply a small dab of glue to the base of each antenna. Carefully press the glued ends onto the top of the butterfly’s head. Hold them in place for a few seconds to make sure they stick properly. This adds a realistic touch to your paper butterfly.
Shape the Butterfly
With the antennae securely in place, gently fold the wings of the butterfly to create a natural, lifelike curve.
Start by pinching the base of each wing and then smoothly guiding the paper outward, mimicking the elegant arc of a real butterfly. Be careful not to crease the paper too sharply; a soft curve adds realism.
- Shape the top wings: Use your thumb to press and shape the top wings, creating a slight upward lift.
- Detail the bottom wings: Pinch the edges of the bottom wings and angle them slightly downward for a dynamic look.
- Add subtle bends: Lightly bend the wings at various points to enhance the natural, fluttering appearance.
Your butterfly should now look ready to take flight!
Prepare Wall Adhesives
Choose a suitable wall adhesive that will securely hold your paper butterflies without damaging the surface. Opt for removable adhesive strips or double-sided tape designed for lightweight items.
First, measure and cut the adhesive to match the size of your butterfly’s body. Next, peel off the backing from one side of the adhesive and press it firmly onto the back of the butterfly. Make sure it’s positioned for best balance.
Then, peel off the remaining backing to expose the sticky side. Have a gentle touch; press the butterfly against the wall, ensuring it adheres well. For added security, lightly press the wings against the wall as well.
Keep a damp cloth handy to clean any residue afterward.
Arrange Butterflies on Wall
To create a visually appealing display, start by arranging your paper butterflies in a loose pattern on the floor to experiment with different layouts. This lets you visualize the final result before committing to a design on the wall.
Consider the following tips:
- Vary Sizes and Colors: Mix different sizes and shades to add depth and interest.
- Create Movement: Position butterflies as if they’re flying in a natural, flowing path.
- Balance and Symmetry: Make sure the arrangement looks balanced by stepping back and evaluating from different angles.
Once satisfied, transfer the butterflies to the wall, starting from the center and working outward. Use painter’s tape to temporarily hold them in place. Adjust as needed, then secure with your chosen adhesive.
This method guarantees a dynamic and innovative display.
Conclusion
Now that you’ve got your beautiful paper butterflies ready, isn’t it exciting to see your wall transform?
By following these simple steps gathering materials, choosing paper, cutting and folding, creating wings, attaching antennae, shaping butterflies, and preparing wall adhesives you’ve crafted a stunning decoration.
Arrange your butterflies in a pattern that brings joy to your space. Enjoy your vibrant, handmade masterpiece!


