How To Make A Butterfly With Money? Step by Step Guide!
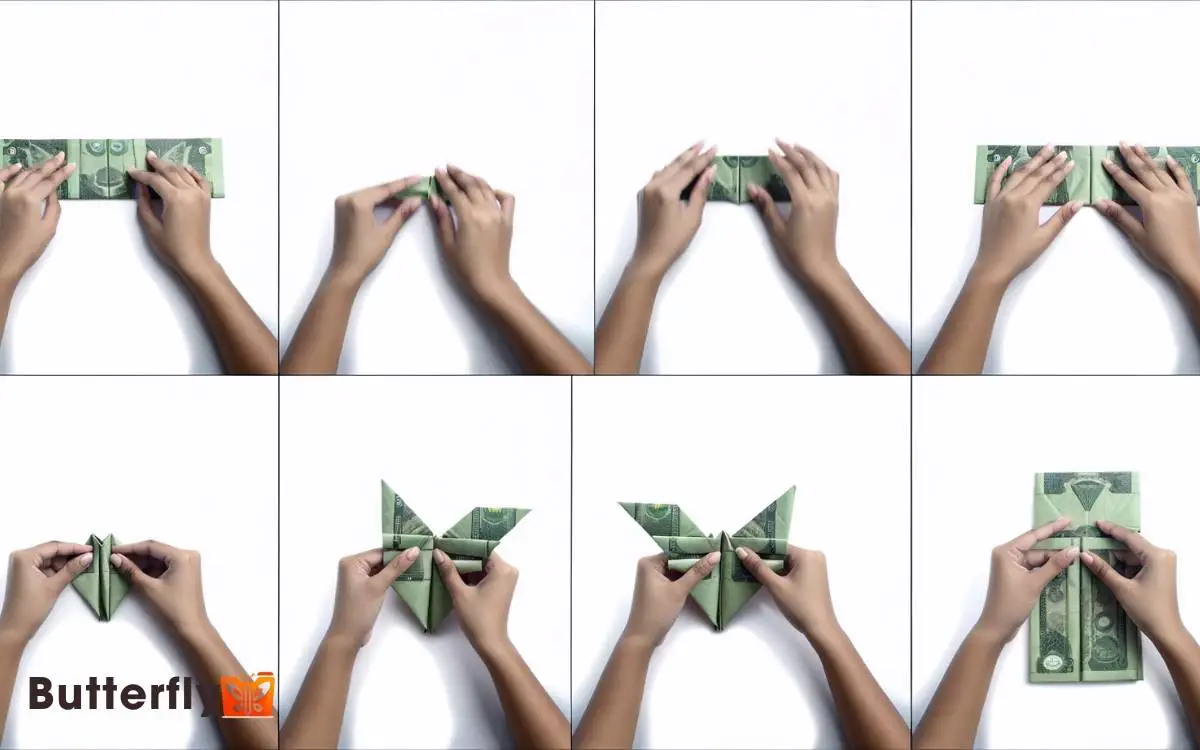
Start with a crisp, new bill free from creases. Fold it in half with precision. Create triangle folds at each end to form the wings. Next, make even accordion folds for texture and dimension.
Carefully shape the wings by creating precise creases and ensuring symmetry. Reinforce the creases for a sturdy structure.
Once the wings are fanned out and lifelike, mount your butterfly in a shadow box or under a glass dome to showcase its beauty. For more details on perfecting this money art, there’s still much to explore.

Key Takeaways
Choose the Right Bill
Frequently, you’ll want to select a crisp, new bill to guarantee your butterfly holds its shape beautifully.
Start by examining the bill’s condition; it should be free from creases, tears, or excessive wear. A fresh bill not only enhances the butterfly’s aesthetic but also ensures precise folds and sharp lines, vital for achieving an elegant outcome.
Consider using a higher denomination, as the intricate designs and vibrant colors can add a unique flair to your creation. The choice of currency is up to you, yet the key is its pristine condition.
Lay the bill on a clean, flat surface, smoothing out any minor wrinkles. This attention to detail sets the stage for a flawless, innovative butterfly.
Fold the Bill in Half
- Start by aligning the bill’s edges precisely to guarantee a clean fold.
- Press down gently but firmly to create a sharp crease, guaranteeing perfect symmetry.
- This foundational step sets the stage for your butterfly’s elegant wings.
Align Bill Edges
Gently fold the bill in half lengthwise, making sure the edges align perfectly to create a crisp, symmetrical crease. Hold the bill firmly at both ends, then press down on the fold.
This step is essential for the foundation of your butterfly. Precision is key, so take your time aligning the edges.
| Step | Action | Purpose |
|---|---|---|
| 1 | Fold lengthwise | Align edges perfectly |
| 2 | Hold both ends | Maintain stability |
| 3 | Press down crease | Create crisp fold |
| 4 | Check alignment | Ensure symmetry |
| 5 | Adjust if needed | Perfect the fold |
Smooth out the crease with your thumb, ensuring it’s sharp and even. This careful alignment will set the stage for a beautiful, innovative butterfly design.
Crease for Symmetry
With the bill already aligned, fold it in half widthwise to create a central crease that will guide the butterfly’s symmetry. Make sure the edges match up perfectly; this crease is the backbone of your design.
Press firmly along the fold, ensuring a sharp, crisp line. This middle crease is essential, acting as the symmetrical axis for your butterfly’s wings.
Unfold the bill, revealing the central line. This line will serve as a reference point for subsequent folds, ensuring each side mirrors the other.
Precision here is vital. A well-defined crease not only enhances the aesthetic appeal but also simplifies the intricate folds to come.
Make the First Crease
Fold the bill lengthwise, creating a crisp crease right down the middle. Make sure the edges align perfectly to achieve a symmetrical fold, which is essential for the butterfly’s balance.
Use your fingernail to press firmly along the fold, enhancing the sharpness of the crease. This precise action lays the foundation for the intricate design that follows.
| Step | Action |
|---|---|
| 1 | Align edges |
| 2 | Fold lengthwise |
| 3 | Press with fingernail |
| 4 | Ensure symmetry |
| 5 | Sharpen crease |
Engage with the paper, allowing its texture to guide your movements. This first fold transforms the bill into a canvas, ready for the artistry that lies ahead. Remember, precision here sets the stage for a flawless butterfly. As you crease the edges carefully, each fold brings you closer to the graceful form taking shape in your hands. Patience is key—rushing through this step may compromise the delicate symmetry essential for your creation. If you’re wondering how to make a paper butterfly with elegance, let each motion be intentional, honoring the art of origami.
Create the Triangle Folds
To create the triangle folds, start by bringing each corner of the bill towards the center crease, forming two small triangles at each end.
Precision is crucial here; make certain that the edges align perfectly with the center line. This step transforms your bill into a canvas of symmetry and balance, the foundation of your butterfly.
Next, sharply crease the edges to maintain the triangle shapes. Think of these triangles as the preliminary wings, delicate yet structured. Your hands should move confidently, guiding the paper with purpose.
Form the Accordion Folds
Begin by taking the bill and folding it back and forth in small, even sections, creating a crisp accordion effect. Each fold should be about a quarter-inch wide, ensuring uniformity. Keep the creases sharp; use a ruler or your fingernail for precision.
- This accordion technique will breathe life into your butterfly, giving it texture and dimension.
- Flip the bill over and continue folding, maintaining consistency. The tighter and more uniform your folds, the more refined your butterfly will appear.
- This process demands focus and a delicate touch, transforming a simple bill into a work of art. Remember, innovation thrives on attention to detail.
Your accordion folds lay the foundation, so invest time in perfecting them.
Shape the Butterfly’s Wings
To shape the butterfly’s wings, start by folding precise creases along the edges to form the wing contours.
Next, adjust the wing symmetry by carefully aligning both sides, ensuring a balanced and graceful appearance.
Your butterfly’s wings should now showcase elegance with every fold and adjustment.
Fold Wing Creases
With delicate precision, fold each corner of the bill inward to create graceful wing creases, shaping your butterfly’s wings. This step requires a keen eye and a gentle touch.
Follow these steps to guarantee perfect creases:
- Top Corners: Fold the top corners toward the center, creating sharp, symmetrical angles.
- Bottom Corners: Fold the bottom corners similarly, making sure the tips meet precisely in the middle.
- Diagonal Folds: Make diagonal folds from each corner, forming a V-shape to mimic natural wing curvature.
- Flatten: Press down gently on all folds to secure the wing structure.
These folds not only define your butterfly’s elegant wings but also showcase your artistic flair and mastery in paper manipulation.
Adjust Wing Symmetry
As you refine your butterfly, make certain each wing mirrors the other by carefully adjusting the creases and angles to achieve perfect symmetry.
Gently unfold and refold any areas that seem off-balance. Use a flat surface to guarantee even alignment. Pay attention to the top and bottom edges; they should form identical curves.
Precision is key here slight deviations can disrupt the overall harmony. Hold the butterfly up to a light source to check for uniformity. Rotate and inspect from different angles. If necessary, press down on stubborn folds with a ruler or a fingernail to sharpen edges.
Your meticulous adjustments will transform your monetary butterfly into an exquisite piece of art, perfect for innovative presentations or unique gifts.
Secure the Center Fold
Hold the folded edges together firmly to create a crisp and secure center fold. This step is important for guaranteeing your money butterfly maintains its structure and elegance.
Follow these steps:
- Align the Edges: Make sure both sides of the fold are perfectly aligned. Precision now will pay off in the final appearance.
- Pinch Tightly: Use your thumb and index finger to pinch the center fold tightly. This helps lock in the sharpness of the fold.
- Repress the Fold: Run your fingernail along the fold to reinforce it. A strong crease is essential for stability.
- Double-check Symmetry: Confirm that both sides mirror each other. Symmetry enhances the butterfly’s visual appeal.
Adjust the Wing Angles
Now that the center fold is secure, gently spread the wings outward to create a graceful angle. Hold each wing close to the center and fan it out, guaranteeing symmetry. For a stunning effect, aim for a perfect 45-degree angle.
Here’s a quick guide to help you:
| Step | Action | Result |
|---|---|---|
| 1 | Hold the wing at the base | Maintain control |
| 2 | Gently pull outward | Begin forming the angle |
| 3 | Adjust to 45-degree angle | Create symmetry |
| 4 | Repeat for other wing | Ensure uniformity |
| 5 | Fine-tune both wings | Achieve a natural look |
With these steps, your butterfly will exhibit balanced, elegant wings.
Reinforce the Creases
To guarantee your butterfly maintains its shape, press down firmly on each crease to reinforce the structure. This secures the folds hold their form beautifully.
Follow these steps to perfect your creases:
- Flatten Each Fold: Place the money on a hard surface, and use your fingernail or a folding tool to press down on each fold.
- Double Check Symmetry: Make sure both wings match in creases and angles for a balanced appearance.
- Pinch the Edges: Lightly pinch the edges of the wings to create sharp, defined lines.
- Run Over with a Tool: Use a bone folder or a similar tool to smooth out and secure the creases.
These steps will help your butterfly retain its innovative and artistic form.
Add Final Touches
With your creases perfectly reinforced, it’s time to bring your butterfly to life with some final artistic touches.
Gently fan out the wings, ensuring symmetry and grace. Pinch the body slightly to give it a natural curve, mimicking the elegance of a real butterfly.
Use a fine-tipped pen to add delicate details to the wings, such as veins or patterns, enhancing its lifelike appearance. You can even add a touch of color with highlighters or colored pencils, accentuating the design without overpowering the intricate folds.
Display Your Creation
Your beautiful butterfly deserves a place of honor where its intricate folds and delicate details can be admired by all.
To display your creation innovatively, follow these steps:
- Shadow Box Frame: Mount your butterfly in a shadow box frame. This not only protects it but also enhances its three-dimensional effect.
- Glass Dome: Place the butterfly inside a glass dome. The transparency allows for 360-degree viewing while keeping it dust-free.
- Floating Frame: Use a floating frame to create an illusion of the butterfly hovering mid-air. This adds a modern, artistic touch.
- Wall Mount: Attach your butterfly to a wall mount with invisible threads. It creates a magical, suspended appearance.
Choose a display method that complements your space and highlights your craftsmanship.
Conclusion
You’ve now transformed a simple bill into a beautiful butterfly. Did you know that origami can reduce stress by 68%? This isn’t just art; it’s a form of meditation.
Adjust those wings for the perfect angle, and reinforce the creases to maintain its shape. Add a personal touch, maybe a tiny doodle or a splash of color.
Display your creation proudly; it’s a confirmation of your creativity and precision. Happy folding!


