10 Steps to Drawing a Red Admiral Butterfly
To draw a Red Admiral butterfly, first gather high-quality drawing paper, pencils ranging from HB to 6B, and colored markers in red, black, and white. Begin by sketching an elongated oval for the body and large ovals for the wings, maintaining symmetry.
Outline the wings, paying attention to the gentle curves and edges. Add intricate vein patterns and distinctive red bands on the forewings.
Position small white spots near the tips for contrast. Gradually layer colors, focusing on depth and seamless changes.
Gently erase construction lines, refine outlines, and add final touches for a realistic finish. For further detailed steps, explore the all-encompassing guide.
Key Takeaways
- Begin with basic shapes: elongated oval for the body and large ovals for the wings.
- Outline wings, focusing on scalloped edges and smooth curves for accurate contours.
- Sketch red bands on forewings and add white spots near the tips for distinctive markings.
- Incorporate intricate vein patterns on wings for realistic structure and depth.
Gather Your Drawing Materials
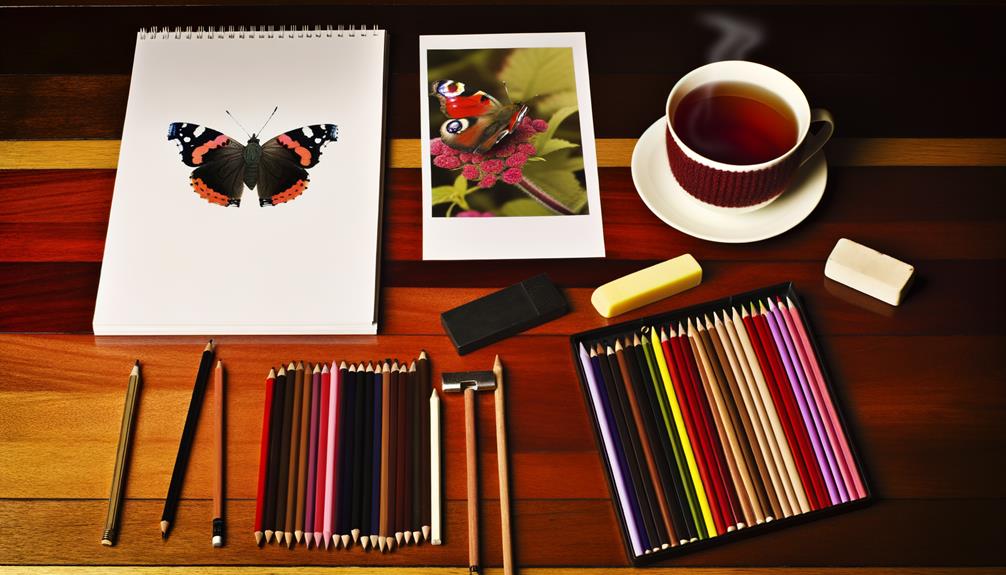
To begin your artistic journey in drawing a Red Admiral butterfly, make sure you have the following materials ready: high-quality drawing paper, a range of pencils (HB to 6B), an eraser, a sharpener, and colored pencils or markers in shades of red, black, and white.
Start by selecting a smooth, thick drawing paper that can handle various pencil pressures and erasing. Your pencil range should include HB for fine lines and 6B for deep shading.
A high-quality eraser will help correct mistakes without damaging the paper. Keep your pencils sharpened to maintain precision in your lines.
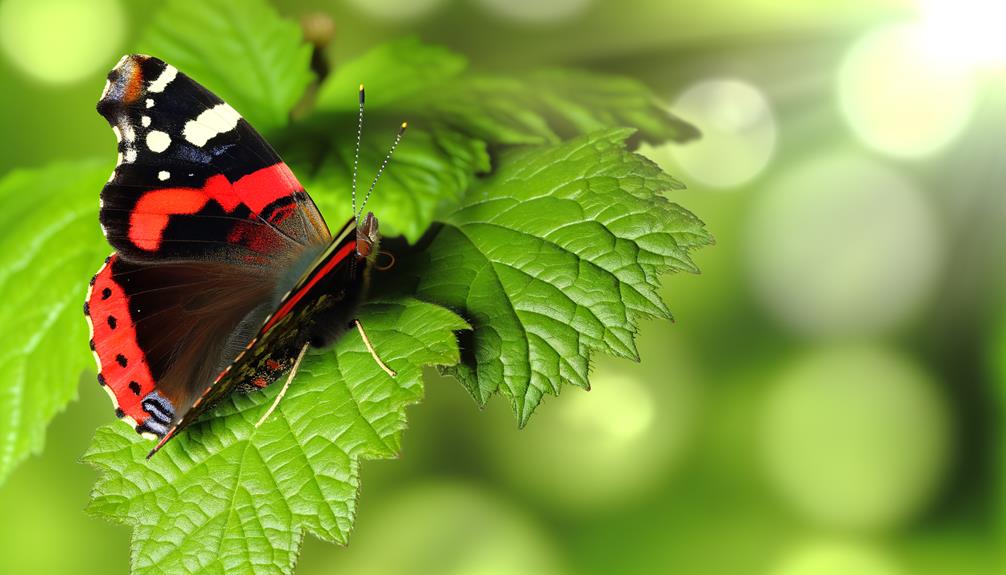
Study the Butterfly's Anatomy
Begin by closely examining the wing structure, noting the distinct shapes and veining patterns.
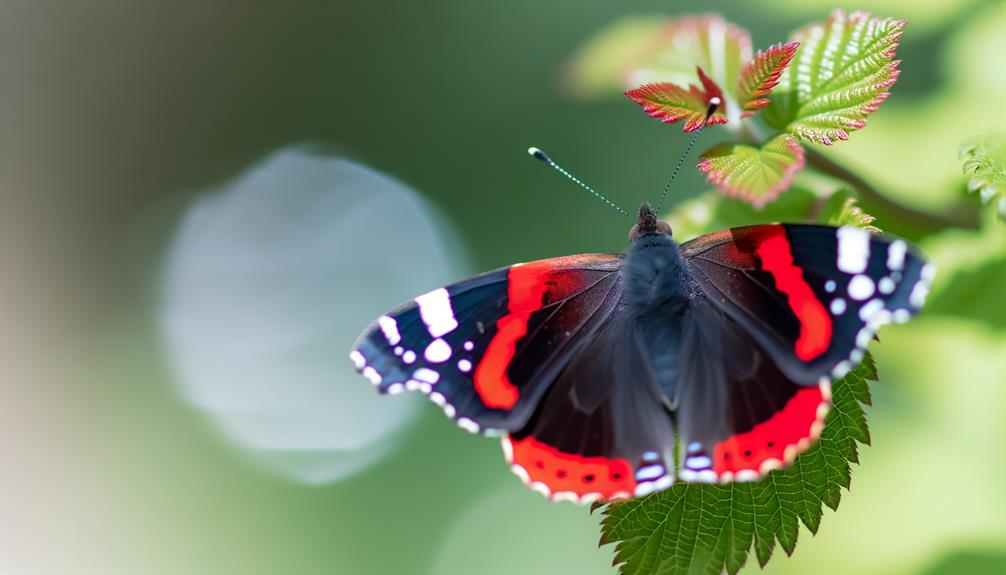
Observe the color pattern, identifying the vibrant red bands and white spots against the dark brown and black background.
Understanding these anatomical details will provide a solid foundation for an accurate and realistic drawing of the Red Admiral Butterfly.
Wing Structure Details
Examining the wing structure of the Red Admiral butterfly, one can observe the intricate patterns and venation that contribute to its distinctive appearance. Each wing is a masterpiece of nature's design, providing essential details for accurate depiction.
To capture its structure:
- Observe the Veins: Note how the veins create a network across the wings, offering both strength and a guide for pattern placement.
- Identify the Sections: Divide the wings into forewings and hindwings, each with specific shapes and sizes.
- Study the Curves: Examine the gentle curves and edges that define the wing's outline.
- Trace the Symmetry: Focus on the symmetrical nature of the wings, ensuring both sides mirror each other precisely.
Color Pattern Analysis
Understanding the vivid color patterns of the Red Admiral butterfly requires a meticulous analysis of its striking orange bands and contrasting dark hues that adorn the wings.
Begin by noting the prominent orange-red bands that stretch diagonally across the forewings. These bands are accentuated by white spots near the wing tips, providing a stark contrast against the dark, almost black background.
The hindwings feature a series of blue crescents near the wing edges. Pay close attention to the subtle gradations of color in these crescents, as they shift from dark to light blue.
The body itself is mainly dark but includes fine, intricate details that can be highlighted with lighter shades to enhance realism.
Sketch Basic Shapes
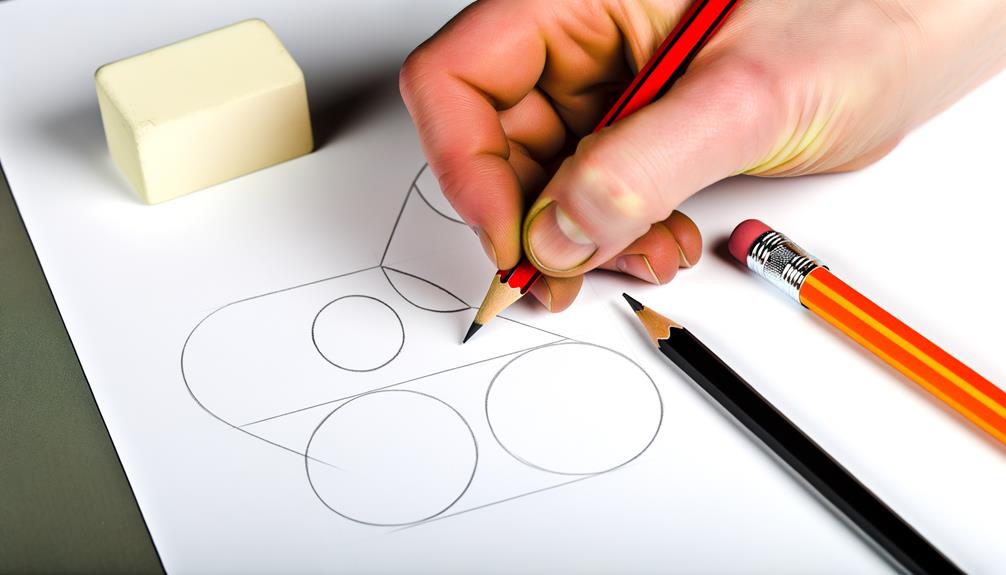
To sketch the basic shapes of a Red Admiral butterfly, start by drawing an elongated oval for the body and add two large, overlapping ovals on either side to represent the wings. This initial framework sets the stage for a lifelike representation. Follow these steps closely:
- Elongated Oval: Begin with a slender, vertical oval at the center for the body, ensuring it's proportionate.
- Upper Wings: Draw two large ovals extending upward and outward from the body's upper section.
- Lower Wings: Add two slightly smaller ovals overlapping the base of the upper wings.
- Symmetry Check: Verify that the ovals are symmetrical and balanced, evoking the natural grace of the butterfly.
These simple shapes form the foundation for your detailed drawing.
Outline the Wings
With the basic shapes in place, begin refining your sketch by outlining the wings, focusing on the distinct curves and edges that define the Red Admiral butterfly's elegant form.
Start by tracing the upper contour of the forewings, noting the slightly scalloped edges and the gentle, outward curve towards the tips.
Then, move to the hindwings, capturing their broader, more rounded shape with subtle indentations along the edges.
Pay special attention to the junction where the forewings and hindwings meet, ensuring a smooth connection.
Use light, controlled strokes to avoid harsh lines, which can be refined later.
This careful outlining will create a more accurate foundation for the intricate details that will follow, setting the stage for a lifelike representation.
Add Wing Details
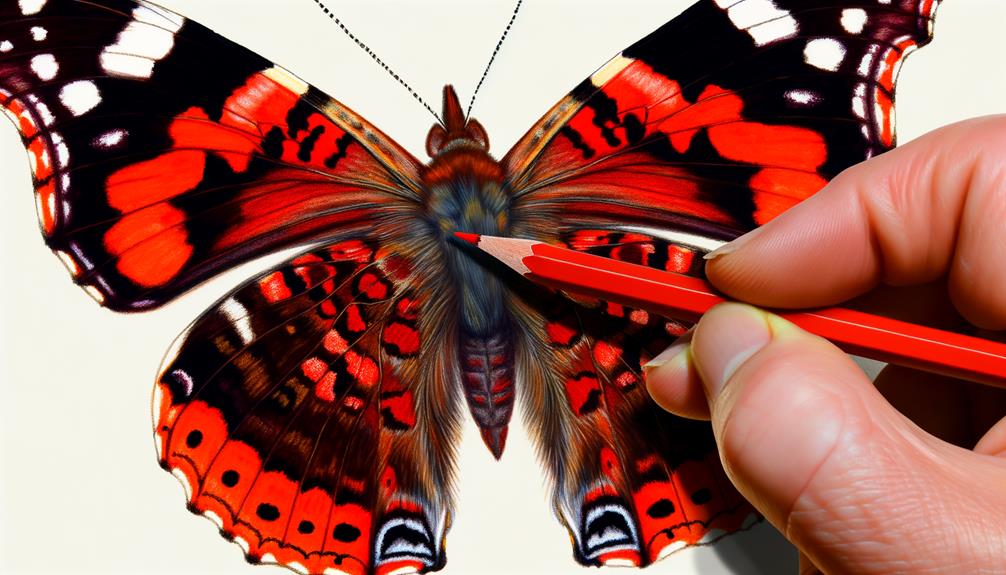
To enrich your Red Admiral butterfly illustration, begin by meticulously outlining the distinctive wing patterns, ensuring accuracy in the unique shapes and structures.
Next, introduce color accents by carefully shading the vibrant red, white, and black hues that characterize this species.
Outline Wing Patterns
Begin by carefully sketching the intricate vein patterns within each wing segment to capture the distinctive structure of the Red Admiral butterfly. These veins not only delineate the wing's framework but also enhance its realistic appearance.
Follow these steps to outline the wing patterns effectively:
- Trace the Main Veins: Draw the prominent veins extending from the wing base outward, providing the primary structure.
- Add Secondary Veins: Introduce finer veins branching off the main ones, ensuring a natural, organic flow.
- Define Wing Segments: Clearly demarcate the different segments, paying attention to their symmetrical arrangement.
- Emphasize Texture: Use varied line thicknesses to replicate the natural texture and depth of the butterfly's wings.
Add Color Accents
By carefully selecting vibrant hues and applying them in layers, you can bring the Red Admiral butterfly’s wings to life, starting with the bold red bands that characterize its upper wings. As you build up the details, blend in deep blacks and subtle white spots to capture the intricate patterns of its wings. Paying attention to these markings not only enhances realism but also reflects the natural beauty of this species. Observing these details can also deepen your appreciation for the remarkable red admiral butterfly migration, as these butterflies travel great distances in search of favorable climates.
Begin by applying a base layer of bright red along the outer edges, guaranteeing smooth, even coverage. Next, blend in deeper red tones toward the center to create a gradient effect, enhancing the natural depth.
Use a fine brush to add the delicate white spots scattered across the black sections of the wings. Gradually incorporate subtle orange accents near the body, blending them softly into the surrounding colors.
Highlight Texture Details
With a fine-tipped brush, meticulously trace the intricate veins that crisscross the Red Admiral butterfly's wings, ensuring each line mirrors the natural, delicate structure.
To achieve an authentic representation, follow these steps:
- Observe Reference Images: Carefully study high-resolution photographs to understand the vein patterns and their intersections.
- Light Pencil Outline: Begin with a light pencil sketch to map out the primary veins before applying paint.
- Layered Brush Strokes: Use thin, layered brush strokes to build up the texture, capturing the subtle nuances.
- Highlight Details: Add tiny, white highlights to certain veins to create a three-dimensional effect, enhancing realism.
Draw the Body
To accurately depict the body of the Red Admiral butterfly, start by sketching an elongated oval shape for the thorax, ensuring it's proportionate to the overall size of the butterfly.
Next, draw a smaller oval attached to the bottom of the thorax to represent the abdomen, tapering it slightly towards the end.
For the head, place a small, rounded shape at the top of the thorax. Add two short, thin lines extending from the head to indicate the antennae.
Emphasize the segmentation by lightly shading the thorax and abdomen, giving the body a three-dimensional appearance.
Incorporate Red Bands
Begin by sketching two distinct, curved red bands on each forewing, making sure they follow the natural contours and extend from the midsection towards the outer edges. This adds vibrancy and captures the essence of the Red Admiral Butterfly.
To achieve precision:
- Outline Lightly: Use a light pencil stroke to outline the bands, providing flexibility for adjustments.
- Observe Symmetry: Make certain both forewings mirror each other for a balanced appearance.
- Apply Color Gradually: Layer red hues softly, starting with a light shade and gradually intensifying.
- Blend Smoothly: Use a blending tool to merge the red bands seamlessly with the surrounding wing area.
Add White Spots
Carefully position small, white spots near the tips of each forewing, ensuring they create a striking contrast against the vibrant red bands.
Begin by lightly sketching tiny circles and ovals, primarily along the outer margin of the forewings. These spots should vary slightly in size to reflect natural irregularities.
Aim for a balanced distribution, with clusters of three to five spots per forewing. Use a fine-tipped white pen or pencil to fill in the spots, enhancing their brightness and opacity.
Pay attention to the spacing between each spot to maintain a harmonious arrangement. This meticulous detailing will authentically capture the unique pattern of the Red Admiral butterfly, adding a layer of realism to your drawing.
Refine and Erase Guidelines
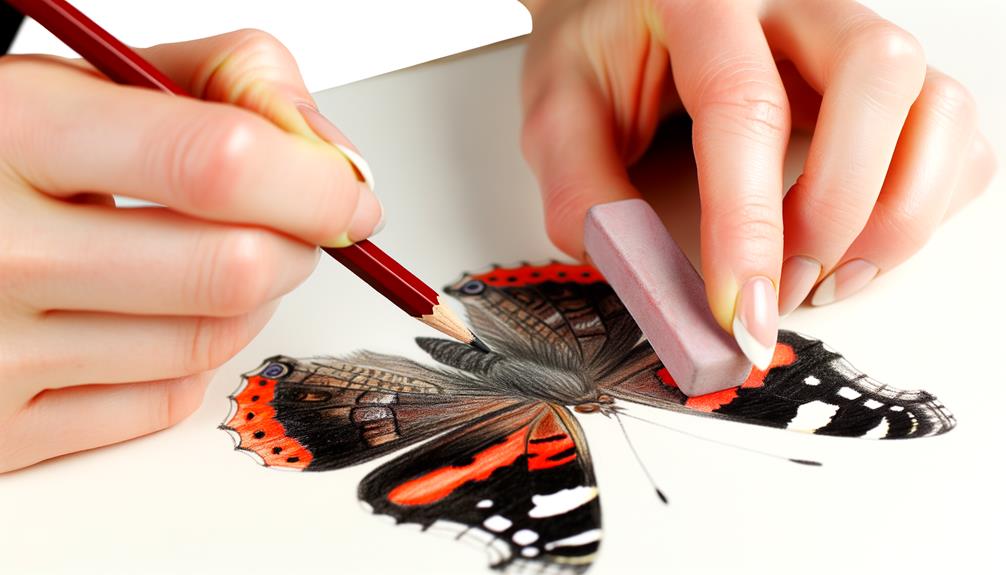
With a soft eraser, gently remove the initial construction lines while guaranteeing the integrity of the butterfly's detailed patterns remains intact.
Begin by delicately erasing around the edges of the wings to reveal the clean, crisp outlines beneath.
Next, move inward, eliminating any remaining guidelines that do not form part of the intricate wing design. Pay close attention to the following:
- Wing Veins: Preserve the thin, delicate lines that mimic the butterfly's natural vein structure.
- Pattern Edges: Ensure the red and black patterns remain sharp and well-defined.
- White Spots: Maintain clarity and precision around the white spots added in the previous step.
- Antennae and Legs: Carefully refine these slender parts to enhance their realistic appearance.
This meticulous process will bring your Red Admiral Butterfly to life.
Final Touches and Shading
To achieve a realistic appearance, start by lightly shading the areas of the wings where shadows naturally fall, using a fine-tipped pencil for precision. Focus on the edges and near the body where the wings connect.
Gradually build the shading by layering soft strokes, ensuring a smooth shift from light to dark areas.
Next, add texture to the wings by incorporating fine lines and subtle dots to mimic the butterfly's intricate patterns. Pay particular attention to the red bands and white spots, enhancing their vibrancy by gently blending colors.
Conclusion
To sum up, the process of drawing a Red Admiral butterfly begins with gathering the necessary materials and studying the butterfly's anatomy.
By sketching basic shapes and outlining the wings, a foundation is established.
Adding details such as red bands and white spots brings the butterfly to life, much like a painter adding final touches to a canvas.
Refining and erasing guidelines, followed by shading, completes the artwork with precision and clarity, resulting in a realistic and vibrant depiction.